Light is tricky to film! the bleed through isn't as noticeable to the human eye and the words look more bright pastel than laser bright glowing! (I think I need a strong light source to film this!!) First off, this is not a cheap way to make a clock, however what it will give you is a rather nice looking discussion point. The project initially began when I stumbled on the Teensy 3.1 this is a great little Arduino clone, but built around an Arm chip instead of an Atmega chip. Although the Teensy 3.1 is a very similar price point to an Arduino it has a number of advantages, aside from the raw speed 72Mhz (can run at 96Mhz!) compared with a typical Atmega clock speed of 16Mhz. This is probably less important that you'd think for many projects but it is an indication of the step up. A very nice feature is a built in real time clock - which is what inspired the idea for some kind of clock project, other features are less obvious like its internal DMA infrastructure (more on that later)
My initial prototype was rough and ready but it very much proved the point - working flawlessly for several months keeping great time. The design was very simple, basically a simple print onto a transparency sheet (I actually doubled up because they were not as opaque as you'd have thought!) Using almost every pin and a whole mess of wires, only meant I had one LED per word, which didn't quite do the job...
Looking round for an alternative lighting method, I
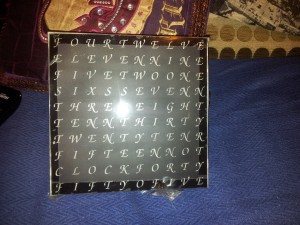
decided on a strip of addressable RGB LED's - These WS2812 usually come in lengths of one metre which contain 60 LED's in total. I'd already designed a grid of words, the grid ended up with 5 lines and rounding up, I could give each word one LED per two characters - this made for rows of a maximum of eleven LED's meaning I ended up with a handful of spare LED's (more booty for the component pile!) on the right you can also see the laser cut front stencil of words (told you its not a cheap project!!)
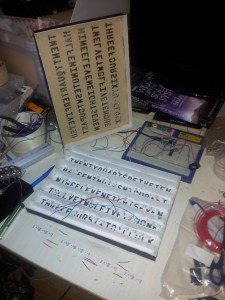
Printing out a template for the back of the enclosure helped with positioning the led's. The great thing about WS2812's is that you can take a pair of scissors to them and have short runs separated but in the same string. On the left you can see the five strings of LED's for each line of text in the template. Once the LED strings were glued down I could then breadboard the circuit.
The circuit is very simple, basically consisting of an octal buffer transceiver as the Teensy 3V3 won't drive the data inputs for the LED strings. One important note is to be careful of the brightness of the LED's even through paper they are quite bright - I even ended up using bits of printer paper as diffusers behind each word
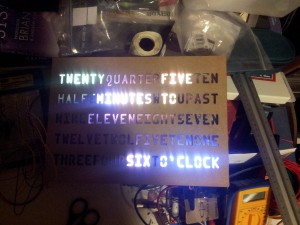
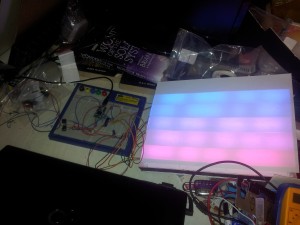
Of course I couldn't wait to get the front on the thing so I could see individual words illuminated! I had to add some black electrical take inside as there was a little too much leakage of light from word to word - as the front will never fit 100% flush to all the dividers in the back there will always be some bleed through but that actually adds to the effect without distracting from which word is obviously illuminated.
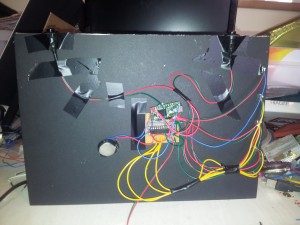
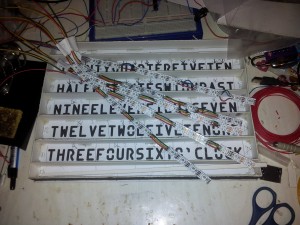
With five strings of LED's needing signal and power and various other bits of wiring I'll be the first to admit the back could be a bit tidier ! Ideally I should have made some kind of enclosure for the circuit... I added a string and some stand offs later so I could hang it on the wall without the wiring getting in the way. A tiny bit of strip board is all that's needed
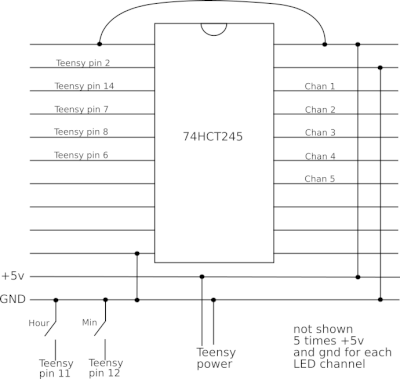
to hold the buffer that we're using as a voltage level shifter, it also handily works to tie everything together. As we move on to look at the firmware for the clock it might be handy to refer to this circuit. As previously mentioned the Teensy has an advanced DMA infrastructure, this is used to great advantage with the WS2812 library which means we can dump a new pattern to the LED chips with minimal overhead to the CPU. While I only need 5 out of 8 possible strings of LED's and one string only needs 9 LEDs not 11 - this isn't a problem just leave them out! I found it particularly useful to write and test specific C subroutines on my machine as it can be quicker and more convenient to debug a simple C function rather than repeatedly uploading to the teensy and debugging via serial messages... The LED's are indexed from left to right and then on to the next string so the first LED on the second string is index 11 (starting from 0 on the first string) This means you can treat the 5 channels as one long string, which is what I did to scroll the colour gradients. The colour gradient is produced by successively LERPing from one random colour to the next. Each step of the colour scroll is done once every tenth of a second, so each colour takes a little under a second to scroll from top left to bottom right. There is also some logic to sort out the correct grammar for the time as randomly words like minutes or O'Clock are omitted, for example the same time will sometimes be shown differently FIVE MINUTES PAST NINE O'CLOCK FIVE MINUTES PAST NINE FIVE PAST NINE Equally when quarter or half (past/to) are used you can't show "minutes" The logic is a little convoluted and rather than over complicate things I just made a bunch of IF statements to handle parsing the time. I wouldn't claim it to be anything like a master piece of coding but for what its worth I've made the code available and the template design for the front panel here... wordclock-files There are two simple switches available for changing the time, one increases the hour and the other the minute, rather than increase in five minute steps it increases in just minute increments - this means a whole bunch of presses to set the time, but it does allow you to set the time a few minutes fast... This means as the time approaches for example half past it will show half past as you'd read the time to someone... The switches trip interrupt routines and there is some timing to de-bounce a potentially noisy switch, so setting the time is independent of the code that handles colour scrolling and displaying the time. UPDATE.... You know how a project is never finished ! While I'll leave the clock as is for the time being looking back at the build there are some things I'd have done differently and some things I'll be changing... On the back side I'll add a fence around the edge instead of two small hold offs, just so it will sit a lot more square to the wall! The dividers for each word should really by attached to the template, while the position of the lights can be a little off - the dividers are not quite in exactly the correct position - an in fact if I were to re-design the front word template I'd make a little more room between characters... The diffuser material (printer paper!) could be glued to the back of the front word template, also I'd put diffusers on the few dummy letters as they look darker than even unilluminated letters with diffusers. So some more "tweaking" to do at a later date!