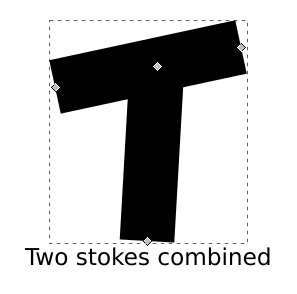
When sending some SVG work to a laser cutter I stumbled on an interesting problem (where really there shouldn't be one!) Now you'd be forgiven for thinking that a vector graphics format using document units of mm (millimetres) couldn't possible have any issue with scale from one package to another... Surely 1mm in Inkscape = 1mm in Adobe Illustrator = 1mm on Pluto!.... You'd think.... It turns out that Inkscape uses a DPI (whats DPI got to do with vector graphics anyway!) of 90DPI which is a size used a couple of times in the w3c SVG standard - of course since its mentioned a few times no doubt Chinese whispers on some forums will quote it as a law... As far as I can tell there seem to be no way to change this 90DPI value - which seems odd but still.... On the other hand Adobe Illustrator has a hang back from the Mac days where all the screens used to be 72DPI (no doubt internally to MacOS there is some backward compatibility kludge regarding this size too (just a guess!)) The upshot is that if you open an SVG in Inkscape created with Adobe Illustrator you'll need to scale it by 125% (90/72=1.25) Of more interest to Inkscape users is creating a document that a Laser cutter firm can handle without problems... Now because a stencil font can't have isolated islands of material, for the project I was working on I ended up making the text myself manually with individual strokes grouped together. The first problem with this is that my strokes were 3mm wide to show the discard area, thankfully laser beams are a tad finer than 3mm so I had to turn my strokes into outlines (these outline have to be rather thin too - more on that later)

If you have a group of stokes for a font, first combine then using combine in the path menu, this actually makes them one "object" rather than a group of individual strokes. That done now with the combined letter selected, in the path menu use the stroke to path menu item.
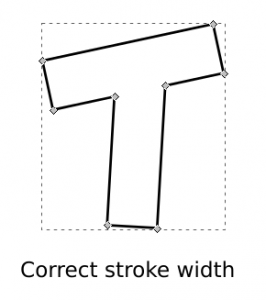
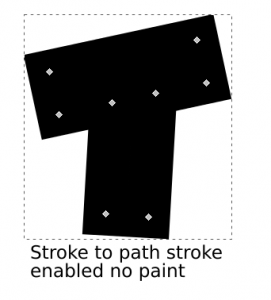
Now you have a path for each letter you can disable fill and enable stoke paint (in the fill and paint side dialog) for the selected path. You will probably have to ramp down the stroke width but leave it something visible for now like 1mm so you can actually see it while fully zoomed out... Once everything is done as an outline you are probably as well to put a box around the whole design that is the expected dimension for the whole material like for example 297mm X 210mm for landscape A4. The last job is to scale the whole thing by 80%, but as this will also effect the stroke width we need to pre-scale the stroke width before scaling it (You could prevent scale from touching stroke widths in preferences - but this is probably not a good idea to keep this setting all the time). A common width for Laser cutting paths is 0.01mm yes thats 100th of a mm ! However we need to pre-scale that first so 0.01mm x 125% = 0.0125, now don't worry when you plug this value into the width as it will have seemed to round it up to 0.013 (but it seems to actually keep the correct value) Now when you select everything in the project and apply a scale transform of 80% (Transform is in the object menu - it will open a dialog in the side bar) if you look at the stroke width it should be 0.01mm as intended. There may be (probably is) a way to turn off or alter the value display rounding but I couldn't find it! Oh now we have our 80% scaled work with 0.01mm paths make sure its all pure red (RGBA ff0000ff) this is another common value in use to indicate a cut as opposed to a burn (or shade) when lasering! Now hopefully your printer/cutter will find it easier to use your designs, but don't forget to ask them to verify that the outside box has the exact physical dimensions you expect ! Many thanks to Amy of artisan model makers (UK) for her patience in allowing me to bat multiple files at her so we could work out what was going on!