One thing for sure is that correctly configuring a vehicle in a dynamics system, is more akin to a "black art" than a straight forward programming problem. There are multiple interconnected things to consider, for example friction side slip and suspension all interact to modify your vehicles behaviour, but are also effected by for example the terrain features vs vehicle size. But the list goes on, and again they are all interdependent. In the code below there is are fair few TODO comments, and even some fixed values that really need to be user definable, but I wanted to release something early especially now its in quite a usable condition.
There are a few things I've done differently with ODE this time, lets address rendering first. Usually I'd iterate over all the physics bodies in a world, however this time I have iterated over all the geoms in the worlds space. This means where previously I'd have to check a body (usually using a custom user data structure) for sub geoms, instead all of any particular bodies geoms are rendered, without need for special checks (the dumbbell shape is an example of a single body with multiple geoms (as is the vehicle itself) . I am actually using a user data pointer for some geoms to filter out none colliding geoms in the collision callback, while I could do this with ODE's collision flags I chose to use a user data pointer as I have a feeling that at a later date I will no doubt be using extra info per geom and probably body too...
One important factor about handling a vehicle is it will naturally have a tendency to roll especially when turning at speed. Although at a "full lock" of 30 degrees of steering at 30+ mph you would probably expect this, part of the issue with controlling a vehicle with a keyboard is that you really need to moderate the maximum turn angle depending on speed as you just don't have the control you would have with a steering wheel or even analogue joystick. That said there are a few tricks you can use to make a vehicle much more stable. The "correct" way would be to implement some kind of "anti sway bar" forces on the suspension, while I did have some success with some code I ported from the ODE wiki, I have found a much better "cheat" that translates well to any physics engines I've used.
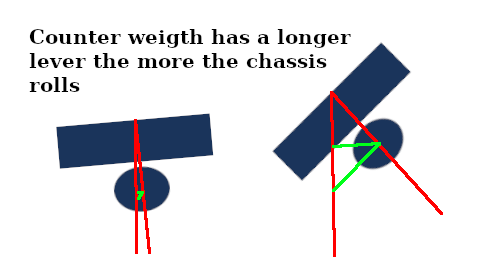
Basically I split the weight of the vehicle into two bodies, one half of the weight is the main body or chassis of the car, while the other half hangs just below the chassis, crucially this bodies geom has its collisions disabled. This has the effect of considerably lowering the centre of gravity of the chassis making the whole vehicle much more stable, the higher the roll the more force from the lever of the lower body is exerted to right the chassis.
While I could have modified the chassis mass properties, I've not had a lot of luck with this technique and with some engines its just not an option, hanging this none colliding body below the chassis with a fixed joint, works really well and gives good stability where ever I have used it, yes its not how things happen in the real world, but often when designing a video game, there are implementations that just couldn't happen in the real world! Trying to create some sort of system the is 100% accurate to the "real" world, often results in "worlds" that are somehow have a less than good "feeling" and are often very fragile to even small changes in parameters! (here be krakens !)
In the example code I have tailored the car to suit particular aims, I wanted bouncier suspension more akin to an off road vehicle, with some skidding and while it should be difficult to roll it shouldn't be impossible if you do something silly. A handy side effect of the anti roll technique is that if a vehicle does end up rolling multiple times it will often naturally end up back on its wheels, as the energy is reduced in the car per roll, there is more chance of the counter weight over coming the next potential roll... Just in case the vehicle does end up on its side or back, there is a counter and after 100 frames of consecutively being on its side the vehicle will be flipped.
I have decoupled the timing between rending and physics, as in common with many dynamics engines its important to use a fixed time per physics step. I've implemented multiple physics "slices" per render frame, the physics is stepped in 1/240th of a second multiple times till its "caught up" with the rendering time of 1/60th of a second (typically but not always) This means in corner cases where render times change wildly, there may be more or less physics steps per render step. This seems to work very well and add to the general smoothness of the whole simulation. If you find that your system is rendering at say 50 FPS then it might be wise to change the physics time step to a multiple of this, ideally I should be querying the typical frame rate, (unloaded frame flip frequency) and multiplying it by a factor of four (which seems to work well)
One important pre-step to getting the demo code working is preparing ODE for use, first download ODE from bitbucket I'm using version 0.16.2 but ODE has had a very stable API over the years and a later version will likely just drop in with little or no changes required. Once you have extracted ODE into the demo projects folder CD into it and run the following to configure its build system
./configure --enable-double-precision --enable-ou --enable-libccd --with-box-cylinder=libccd --with-drawstuff=none --disable-demos --with-libccd=internal
A quick mention of the precision used, you can use single single precision (floats) and while this might be slightly faster on some platforms it could actually end up being slower on 64bit systems (modern laptops or desktops) you will have to check it out for yourself, especially for example on 32bit embedded or some Android systems. In either case the demo code will happily work with single or double precision (unless I broke something!)
Once ODE had been compiled, from the main directory of the demo project just run make and the demo will be built ready to run...
Aside from the various TODO's in the source code, I plan to implement some way points and have multiple "AI" controlled vehicles following a path, this is actually easier to implement than you might expect, but really does look great, last time I did this was using the monkey engine with a proper mesh for the car and it did look rather neat in the end!
If you are interested in collaborating with my ODE work please do grab the code and have a look, if there is sufficient interest I will probably throw something up on bitbucket should people be interested in contributing pull requests.
You can get the code here.
Enjoy!