

When I began developing my Matrix Chain Sandbox app, I always had it in mind to do (at least one) tutorial using this tool as a teaching aid. Well my aim grew just a little higher after releasing my Old School 2 intro, I was inspired by the logo idea and I wasn't surprised it got people's interest - really the whole thing was based around that one idea. It then occurred to me that with a little hacking I could extend the Matrix Chain sandbox to handle all 330 cubes in the Raylib logo. This gives a practical and I don't mind say I think quite impressive example of just what you can achieve with Matrix transforms.
From my very early days with Raylib one of the first features I spotted was the matrix transform member of the models structure, what a very good idea, as you can see it leaves the door wide open and maximises flexibility.
To get the best out of the following tutorial you really need to compile the code and follow along step by step, now I'll be honest when I developed Old School 2, I really didn't pay too much attention to just how CPU intensive it was, and this tutorial wouldn't be quite so useful if you could only use it on really high end systems, but worry not, I'm editing this on my 5th Gen Intel, five year old laptop, from time to time I do keep getting caught out by the power of modern hardware, my stalwart Dell copes with this modified version of the Matrix sandbox with ease...
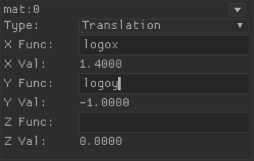
In order for the modified version of the app to show the logo I've had to add a few special variables to the expression evaluator. These variables are called logox and logoy, and as the whole chain of matrix operations is applied to each cube in the logo these variables are changed, because the chain is being applied 330 times, you'll only see the evaluated value for the last cube in the logo. Its important to remember these values are changing for each cube in the logo every individual frame.
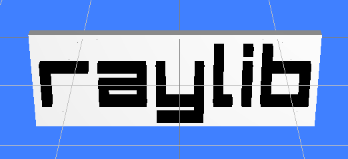
Hopefully you should now see the Raylib logo in all its wonderful glory in black and super tasteful RAYWHITE ( yeah I can't tell the difference from WHITE either ;-p ) okay so now hopefully you're looking at the raylib logo
This was my first step, with all the cubes just close enough to look like one solid object, but lets be honest, we could just do this with a single model it would be a lot faster so lets add something to give the wavy flag effect, which was the very first effect I added
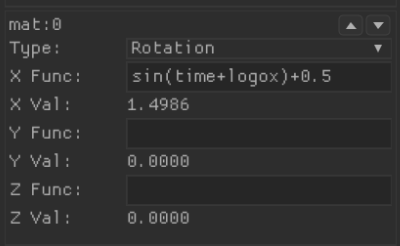
On the matrix below the one you've just added, change this matrix to a Rotation matrix, in the x function entry box just add sin(time), okay something's happening but maybe not quite what you expected, each row is pitching up and down, interesting but not quite what we're looking for. Looking at the top right corner of the Rotation matrix you can see two little arrows, this enables you to change the order of the matrices, move this rotation matrix so it becomes the first matrix. Remember with matrix operations the order of the multiplications is crucial. Now this should look immediately more useful, the whole logo is pivoting with the first row as the axis of rotation, not quite a wavy flag effect but close, now change the x function for this rotation matrix to read sin(time+logox) and there we have it our first effect! As each column of the logo is rendered, the logox variable is being incremented, by adding this to the time variable in the sine function, each column is progressed just that little bit further through the sequence of sine values. The end effect is that we have a flag like movement pivoting on the first row. You can orbit the camera in 45 degree steps around the logo using the TAB key, this is very useful to get a different look at what's going on.

Time now for another custom variable this time called pulse1 this is to simulate the value that is triggered by the bass drum, it pulses every 100 frames giving alternatively a positive then negative kick. This wants to be in its own Rotation matrix which you should push right to the top of the chain. There's a bunch of smoothing going on and this value is really just to give the effect of something regularly triggering slightly different actions each time it fires, you should see a nice smart snap followed by a fade back to the original position
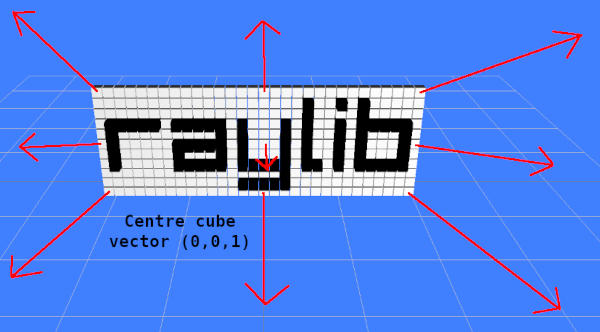
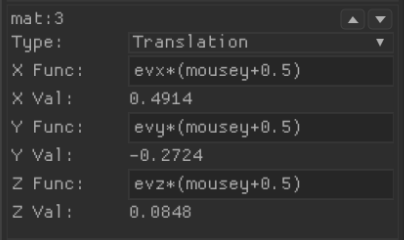
Our final transformation is a little complicate in that although we technically have all the required information, I've decided for the sake of simplicity and clarity to provide the vector as three more custom variables. This "explosion" vector for want of a better name (see picture above) effects each cube depending on its position within the logo. The most central cube is coming straight down the Z axis towards the camera.
As you reach the edges the vector points progressively further outwards I just hope that my hopeless illustration skills have made it at least a little clearer. Unlike the snap effect for the bass drum I've decided to tie this effect to the Y axis of the mouse, this will allow you to gradually move the mouse up and down to see the effect of this vector, it might be a good idea to turn some of the matrices temporarily into identity matrices. You won't loose what you've typed into the function boxes but it will stop the matrix actually doing anything allowing you to see just a few of the matrices working together. This will allow you to get a good grasp of what any one particular operation is doing.
So to review our chain of matrix operations, start with a Y rotation using the pulse1 variable.
Next another rotation this time on the X axis sin(time+logox)+0.5
Then actually put all the cubes into position using logox and logoy in their respective axes
And finally finish off with our mouse driven "explosion" vector.
Now to use a somewhat vulgar expression there is more than one way to skin a cat, this is just the set of operations I ended up with to get the effect I was after. You may well have noticed while moving things around some interesting effect. I can only encourage you to experiment, you can achieve amazing results with matrix operations. While this tutorial has probably been a little hard going, just pause for a moment we have a really complex transformation going on, yet its all done in just four steps, two rotations and two transformation. I dare not think what you could do if you used up all 16 matrices in the full chain!
Before I leave you to your experimentations its worth noting that shoe horning the logo into the Matrix Chain Sandbox was a quick 20 minute hack, its worth looking at the original application as you get markers showing the effects of each stage of the chain and a line joining each stage too. These little helpers can be invaluable in understanding what's going on, oh and don't forget its well worth changing your viewpoint by orbiting the camera with the TAB key...
Oh and if you manage something your proud of take a quick screen cast and throw it up on some video service, I'd love to see what people can do with this, I hope to be amazed !
Enjoy!