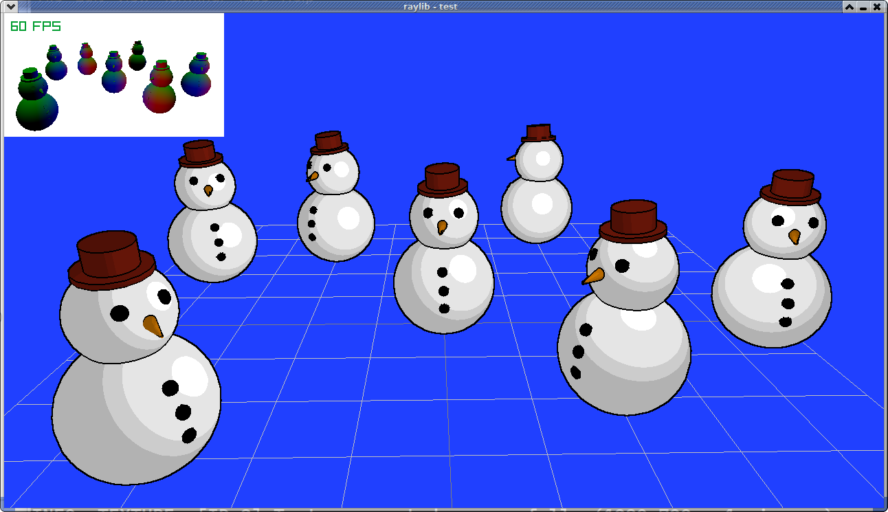
Cell shading (sometimes called toon shading) is a fantastic way to give your game a really neat style. There are really two different aspects to a toon shader, one is the banded lighting, and secondly the outlining of the whole model and also outlining the separate features in the model. In order to detect interior features in the model first all the surface normals in the scene are rendered onto a white texture you can see this in the little square in the top left corner of the screenshot. This texture is used to overlay the rendered scene but is rendered completely transparent if there isn't very much difference between neighbouring normals, so where the snowman's head meets the body for example there is a difference in the normals as the faces are facing in very different directions. There is an issue with this method the outline really could do with being anti-aliased but when a scene is in motion it really doesn't seem too noticeable. Actually rendering the scene itself is done with a modified version of a simple lighting model.
    // create a banding effect
    if (NdotL > 0.95)
        NdotL = 1;
    else if (NdotL > 0.6)
     NdotL = .9;
   else if (NdotL > 0.4)
     NdotL = .8;
   else
      NdotL = .7;
With ordinary lighting the dot product of the normal and light direction determine the shading of the models colour, if we turn this dot product into a banded result then that limits the colour pallet used and gives a cartoon like appearance. The model itself doesn't even need to be textured, relying instead on just the diffuse colour for different faces.
Now you have a rough idea how it works, you can see the details for yourself from this working example.
An updated version is available here