Last time although we didn't actually do any physics, a simple renderer was introduced that has given us a foundation to build upon, you should review this previous post and have a good look at its code before continuing here.
Speaking of code as usual there is more code available to accompany this post (link at the end) but before we even get to looking at the code we need to set up ODE (Open Dynamics Engine) . Normally I'd suggest just using the development libraries from your package manager, however in my experience because of the complex nature of the library, its often compiled with default options. In order to do what we want later its worth compiling ODE for yourself. I'm currently using the 0.16 release. I recommend compiling it with the following options:
./configure --enable-libccd --with-drawstuff=none --with-box-cylinder=libccd --disable-demos
The rest of the defaults should include stuff we need later like for example static trimesh which I like to use for terrains. The compilation shouldn't take long even on the modest laptop I've developed these tutorials on, the developers have reliably provided point releases in good working order a testament to their quality work.
Right with that out of the way, we can look at the additions I've made to get a bunch of falling bodies. First of all its a good idea to have your own structure to keep track of each of the bodies, at some point in the future you'll want to classify different bodies in ways that might have less to do with physics and much more to do with game rules. For now our simple structure will just give us a quick way to look up properties.
float sz[3]; // "scale" or size of the bodies shapedBodyID body;dGeomID geom;float totalMass;
Later on we could add surface properties to this info for example, handily ODE allows us to store a user defined pointer with each body as we'll see later.
ODE groups everything in a "world" which can have multiple collision "spaces", initially we'll just deal with a single simple space.
dInitODE();world = dWorldCreate();dWorldSetGravity(world,0,-9.8,0);dSpaceID space = dHashSpaceCreate(0);contactgroup = dJointGroupCreate(0);
So this is all fairly obvious stuff, with the exception of the contact group which needs a little illumination. When a collision happens the two bodies involved need to react to each other, in order to arbitrate the forces involved with the collision, contact joints are temporarily created.
Before looking at how we set up bodies as we've already touched on contacts lets have a look at the contact callback which is responsible for creating the contact joints
static void nearCallback(void *data, dGeomID o1, dGeomID o2)
{
    int i;

    // exit without doing anything if the two bodies are connected by a joint
    dBodyID b1 = dGeomGetBody(o1);
    dBodyID b2 = dGeomGetBody(o2);

    if (b1 && b2 && dAreConnectedExcluding(b1, b2, dJointTypeContact))
        return;
The first part of the callback filters out any bodies that are connected with none contact joints, while this isn't obligatory it is often a much better way of working, as a joint should usually be set up to keep the two bodies apart in any case.
    // set up the surface properties for the contacts
    dContact contact[MAX_CONTACTS];
    for (i = 0; i < MAX_CONTACTS; i++) {
        contact[i].surface.mode = dContactBounce || dContactSoftCFM;
        contact[i].surface.mu = 500;//dInfinity;
        contact[i].surface.mu2 = 500;//dInfinity;
        contact[i].surface.bounce = 0.4;
        contact[i].surface.bounce_vel = 0.4;
        contact[i].surface.soft_cfm = 0.2;
    }
I'd strongly recommend refering to the ODE manual (if you haven't already) as the surface parameters are documented there, this is the point where in future we could look up our own structure connected to each body, and calculate the appropriate properties. For example you'd want metal v's ice surfaces to behave differently to concrete v's rubber. For now however we're just assuming everything is made out of the same stuff...
    int numc = dCollide(o1, o2, MAX_CONTACTS, &contact[0].geom, sizeof(dContact));
    // create a contact joint for each contact
    if (numc) {
        for (i = 0; i < numc; i++) {
            dJointID c =
                dJointCreateContact(world, contactgroup, contact + i);
            dJointAttach(c, b1, b2);
        }
    }
The last part of the collision callback actually creates the previously mentioned contact joints. Okay this all seems a little complex and we haven't even created any bodies yet, however if you really want to get to grips with ODE its important to get to grips with this subject.
Now after all that lets have a look at creating our bodies...
    dMass mass;

    for (int i=1; i<NumObj; i++) {

        phys[i].body = dBodyCreate(world);
        dBodySetData(phys[i].body, &phys[i]);

        phys[i].sz[0] = rnd(.5f,1.f);
        phys[i].sz[1] = rnd(.5f,1.f);
        phys[i].sz[2] = rnd(.5f,1.f);

        dBodySetPosition(phys[i].body, rnd(-20,40), rnd(10,60), rnd(-20,40));

        if (i < NumObj/3) {
            phys[i].geom = dCreateBox(space, phys[i].sz[0]*2, phys[i].sz[1]*2, phys[i].sz[2]*2);
            dMassSetBoxTotal(&mass, 1, phys[i].sz[0]*2, phys[i].sz[1]*2, phys[i].sz[2]*2);
        } else .....

    ... other geom types set up here ...

        phys[i].totalMass = mass.mass;
        dGeomSetBody(phys[i].geom, phys[i].body);
        dBodySetMass(phys[i].body, &mass);
After creating our body, we set the bodies user data pointer to our structure, this allows us to note (amongst other things) the overall size of the body, which we'll use later for rendering. After setting the position of the body, we create and attach some physical geometry to the body, this is what will actually be colliding with other bodies. The mass of the body is also set up, obviously heavy bodies will effect lighter bodies more. We also set up a few other geometry types too, but I've left that out for the sake of simplicity. Having seen how a box shape is setup, looking at the rest of the code and using the ODE manual you should be able to work out how the other shapes are created (you did Read The Fine Manual didn't you).
Not all bodies actually move, its very handy to have static things, I'm quite keen on having a static ground to stand on!
    // create the static ground
    phys[0].body = NULL;
    phys[0].sz[0] = 50; phys[0].sz[1] = 0.2; phys[0].sz[2] = 50;
    phys[0].geom = dCreateBox(space, phys[0].sz[0]*2, phys[0].sz[1]*2, phys[0].sz[2]*2);
Static objects in ODE don't have a body, so all we need to do is create a geometry and we'll have some solid ground to fall on to. Now we have everything set up we can enter our main loop, this will consist of "stepping" the world and rendering the results.
        // step the physics
        dSpaceCollide(space, 0, &nearCallback);
        dWorldQuickStep(world, 1.f / 60.f);
        dJointGroupEmpty(contactgroup);
First of all we check the world for collisions, this is where are aforementioned collision callback come into play. Having done this we can move time on a little ("step" the world) after which all the contact joints that were used in this step are removed. Its important to use a fixed time steps as ODE isn't designed to use variable time steps and odd things will start happening, this is why I've asked GLFW to sync to each frame refresh. For just a few simple looking calls there is a lot of complexity going on under the hood and this is what breathes life into our world...
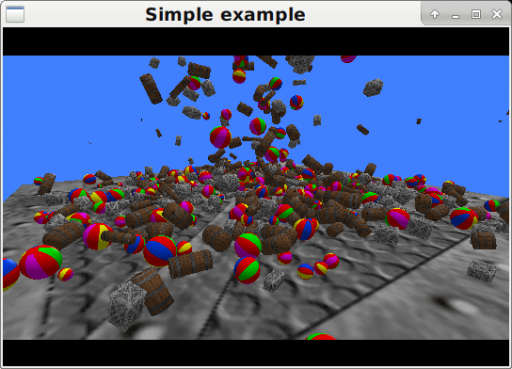
As we loop through all the bodies in our world to render them we are also doing two other things, first of all just for fun, if the space bar is held down we're adding an upwards force to all the bodies - this is the correct way to move a body, you definitely shouldn't be manually setting the bodies position each frame!
    if (spaceKey == GLFW_PRESS) {
        dBodyAddForce(phys[i].body,
                       rnd(-50,100)*phys[i].totalMass,
                       phys[i].totalMass * 20.0f,
                       rnd(-50,100)*phys[i].totalMass);
Notice that the force is proportional to the total mass of the body, lighter bodies will need less of a push, as it happens here all are bodies are set up with the same mass regardless of their size as it's just a simple demo of falling bodies I'm not too worried about there relative densities...
    // reset any body that falls off the ground
    if (pos[1]<-10) {
        dBodySetPosition(phys[i].body, rnd(-20,40), rnd(10,60), rnd(-20,40));
        dBodySetLinearVel(phys[i].body, 0, 0, 0);
        dBodySetAngularVel(phys[i].body, 0, 0, 0);
There are times when setting a bodies position is appropriate in this case when a body has fallen off the box we are using as the ground we are breaking all the laws of physics and teleporting the object to drop again on the ground. The linear and angular velocities are also zeroed just to ensure things don't get too wild!
    setTransform(pos, rot, mod);

    int gclass = dGeomGetClass(phys[i].geom);
    if (gclass == dBoxClass)
        drawObj(&boxObj, phys[i].sz, 1, mod, &camera);
After we have affected the bodies if needed they can be rendered, I've written a setTransform function which takes an ODE rotation matrix and a position vector, and produces a combined matrix suitable use with OpenGL. Looking up what type of geometry the body has means we can then render it with the appropriate shape and texture, the size of the object is also looked up from the structure that's attached to the body.
        // render the static ground
        mat4Identity(mod);
        drawObj(&boxObj, phys[0].sz, 1, mod, &camera);
You might have notice that the render loop starts at 1 the second object, this is because we've reserved the first place for our static ground, as this is placed in the centre of our world and never moves, only an identity matrix is need to render this ( an identity matrix represents no rotation and a position of 0, 0, 0 ).
That's plenty to digest for the time being so grab the code and see it in action, its worth noting that even without getting involved with the real meat of ODE (the joints) that there is still enough functionality here to write a simple game, you could for example make a stack of boxes, allow the user to aim a cannon, and when its fired add a large force in the direction the cannon is pointing to a ball.... and you have angry boxes !
Next time we'll have a look how we can use joints to emulate a wheeled vehicle... Enjoy!